Global Payments terminals
Starting with version 13.0.3, GEM-CAR can send transactions to Global Payments1,2 terminals for sales and returns. It also starts the printing of the settlement reports on the terminals while doing the end-of-day procedure. All this makes it easier for you to manage customers’ card payments and end-of-day procedures. Make sure to update GEM-CAR to the latest version to benefit from these new features.
In this user manual, we will provide you with the information on how to configure GEM-CAR and the Global Payments terminals to work together. Prior to this configuration, please make sure that all the initial configuration has been made with the help of Global Payments technical support and that they are fully functional.
The transcriptions below will be used to refer to certain buttons on the Global Payment terminals.
Configure the terminals
Enable Semi-integration mode
For transactions to work in tandem between Global Payments terminals and GEM-CAR, the Semi-Integrated mode must be activated on the terminals. Follow the steps below to configure the semi-integration mode and so benefit from the integration with GEM-CAR. Once activated, you can switch between Semi-integration and Standalone modes.
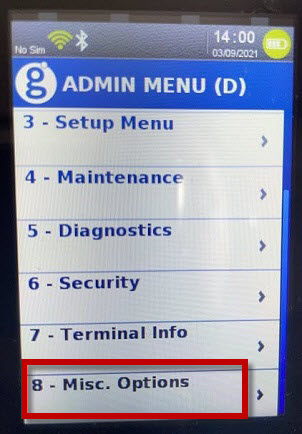
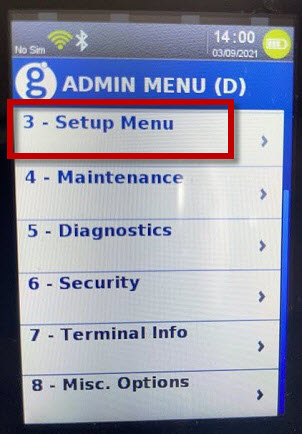
- From the home screen on the terminal, press [admin].
- Scroll down the list of options and select Misc. Options.
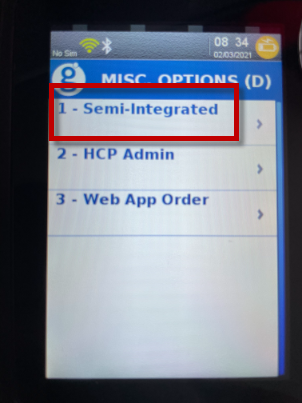
- If you are starting the terminal for the first time, create an administrator username and password. Otherwise, enter an administrator name and password and press [enter]. If you do not have this information, contact the administrator who configured the terminal.
- Select Semi-Integrated. If it's absent, the terminal's firmware needs to be updated. See Download update files for more information on how to update the terminals or contact Global Payments.
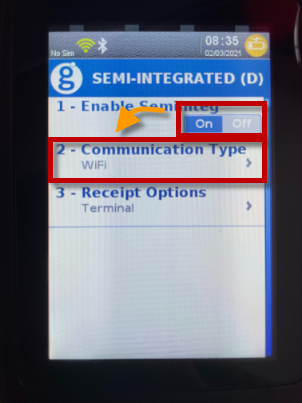
- Toggle the Enable - Semiinteg switch on or of. If you configure the semi-integration mode for the first time, go to the next steps. Otherwise you are done.
- Enter the Communication type menu.
- Choose Wi-Fi for the Move/5000 or Ethernet for the Desk/5000.
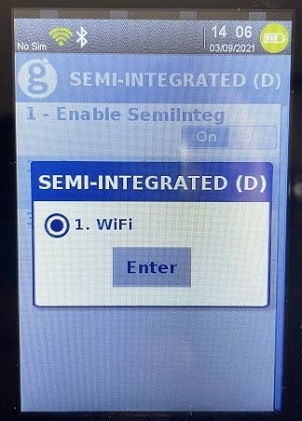
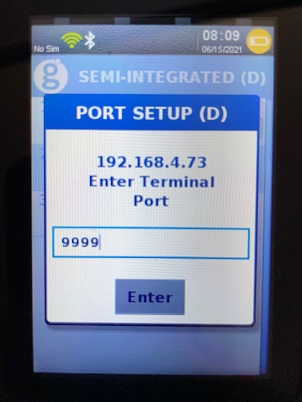
- Enter 9999 in the Enter Terminal Port field. Also note down the IP address onscreen. You will need it for other configurations.
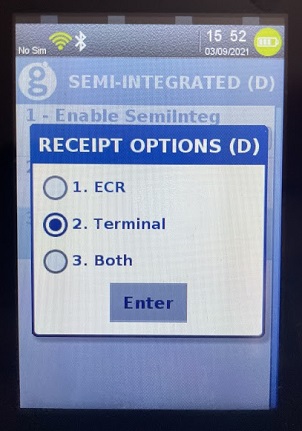
- Return to the Semi-Integrated menu and select Receipt Options.
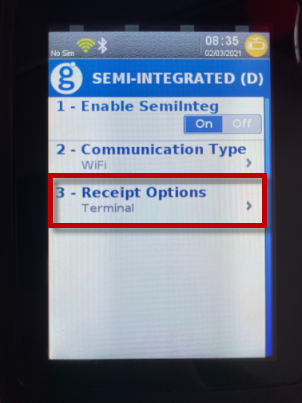
- Choose to print receipts on the terminal.
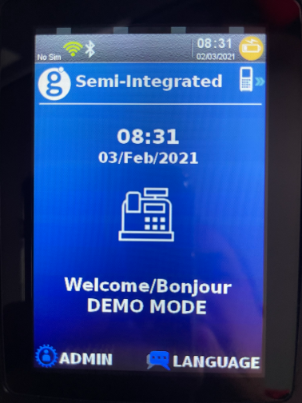
- Press [cancel] to return to the home screen. When the Semi-Integrated mode is enabled, the home screen changes.
Configuration of Wi-Fi for the Move/5000
The Move/5000 needs to be connected over Wi-Fi. In order to do so, please follow the steps below.
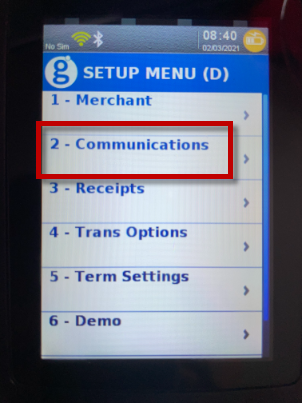
- From the home screen on the terminal, press [admin].
- Scroll down and select Setup Menu.
- Enter an administrator name and password and press [enter].
- Go to Communications > Wi-Fi > Wi-Fi - ON/OFF to enable Wi-Fi mode.
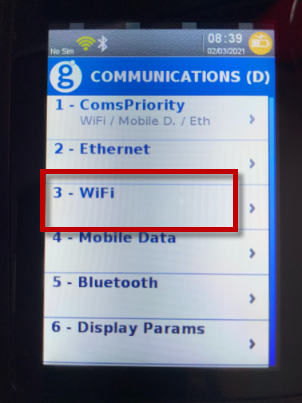

- When the terminal displays Wi-Fi Enabled, press [enter].
- Press [cancel] to return to the Wi-Fi menu.
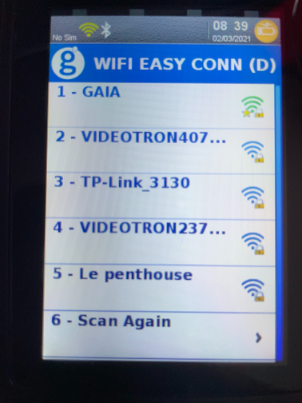
- Select Wi-Fi Easy Conn.
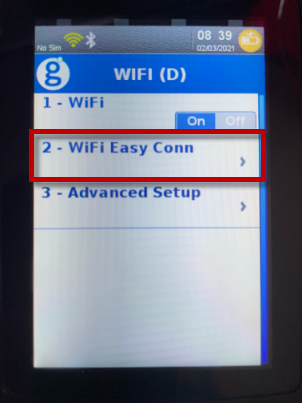
- Select the Wi-Fi network to which you want to connect, enter the password and press [enter].
Configuration of Network priority and IP address
Every device on a network has a unique identification number used by the router. These unique numbers are called IP addresses and are composed of four (4) numbers separated by periods. Each of these numbers can, technically, range from 0 to 255. There are three (3) ways an IP address can be attributed to a device on a private network. You will find below a description of these three (3) possibilities and their benefits and drawbacks. We will also explain why we recommend configuring a static IP address in the Global Payments terminals and how to achieve this setup.
Dynamic IP address
Dynamic IP address attribution is the default configuration for most routers. With this setup, a device requests an IP address to the router when it connects to the network. An available IP address is then dynamically assigned to this device and can change from time to time. A dynamic IP configuration is possible but problematic for the integration of Global Payment terminals with GEM-CAR. In fact, because GEM-CAR needs to know the IP address assigned to the payment terminal in its settings, if the IP address of this device changes because of dynamic IP assignation, the connection will be lost. Consequently, the new IP address will have to be configured in the GEM-CAR parameter each time an IP address is dynamically assigned to a payment terminal. For this reason, you should configure a static IP address in the parameters of the payment terminal or, alternatively, a reserved IP address in your router's settings with the help of your network administrator.
You can configure a device to always use the same IP address when it connects to the network. This way, it will never ask the router for a dynamic IP address when connecting and its IP address will never change. Because GEM-CAR needs to know the IP address attributed to the payment terminal in its parameters, we recommend that you configure the Global Payments terminals to use a static IP address.
Reserved IP address
In their settings, some routers allow you to reserve IP addresses for specific devices. With this type of configuration, when a device asks for a dynamic IP address, the router then always assigns this same reserved IP address to it. Because the IP address always remains the same, this configuration can be used as an alternative to the static IP configuration. The setup process being different for every router model, if you prefer this option, please consult the user manual of your router or ask for help from your network administrator. It can also be referred to as DHCP reservation in your router's settings.
Static IP configuration
IP addresses are composed of four (4) numbers separated by periods, each of these numbers ranging from 0 to 255. Router manufacturers commonly use 192.168.0.x or 192.168.1.x as three-digit subnets for private IP addresses, the x value corresponding to the number attributed to a device on the network. Therefore, we recommend that you use either 192.168.0.99 or 192.168.1.99 as the static IP for the terminal, depending on the subnet used by your router.
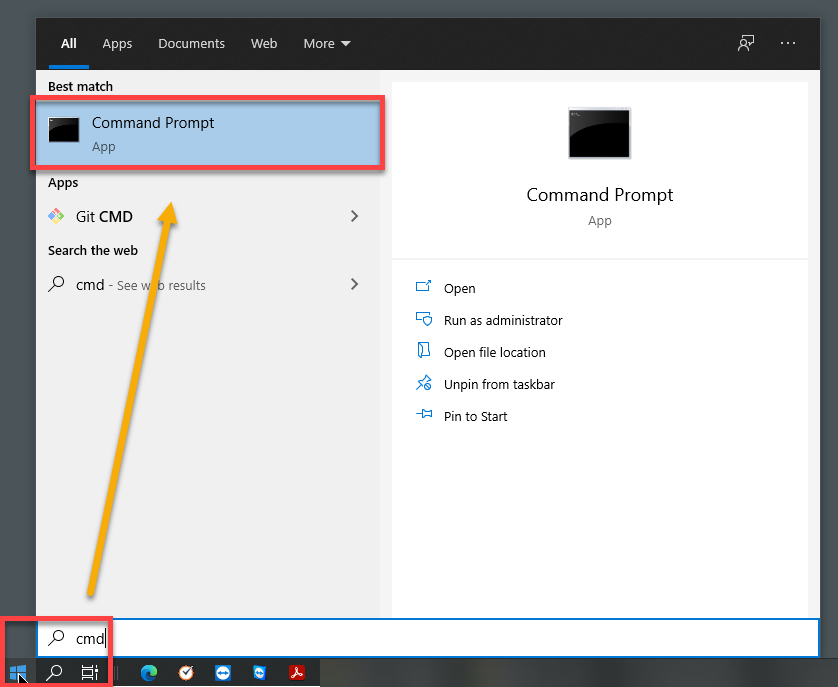
To find out the subnet used by your router, you can scan for the private IP of a Windows 10 computer on the network. To do so, first click on the Windows Start Menu, type cmd and click on Command Prompt.
Then, in the Command Prompt window, enter the command below and hit Enter.
ipconfig
The private IP address of the computer will be listed under IPv4 Address. When configuring the static IP address of a Global Payment terminal, use this same subnet (three (3) first digits) at steps 4 or 5 depending if you use the Move/5000 or the Desk/5000 terminals.
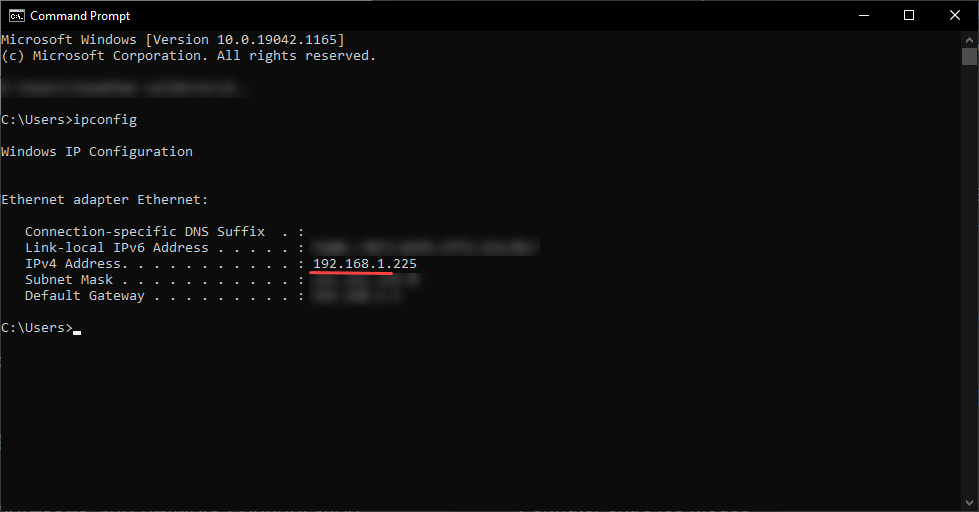
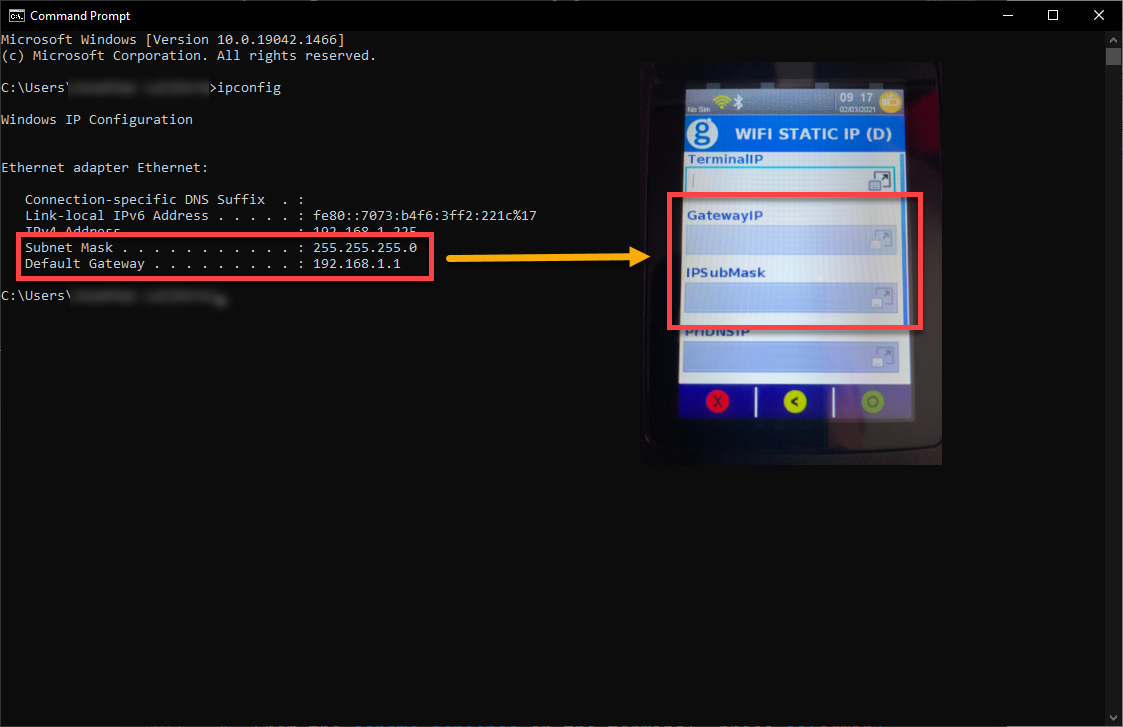
In this window, also note down the Subnet mask and the Default gateway. You will need this informations to configure the static IP address.
Then, follow the instructions below to set up the network priority and configure a static IP address on the Global Payments terminals. If you need more assistance concerning IP addresses and/or network configuration, please contact your network administrator.
- From the home screen on the terminal, press [admin].
- Scroll down and select Setup Menu.
- Enter an administrator name and password and press [enter].
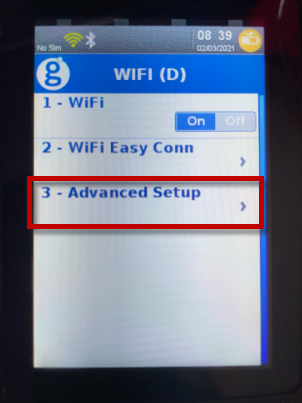
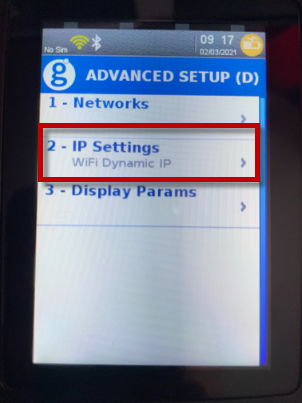
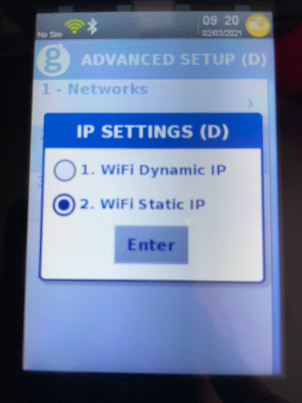
- For the Move/5000, go to Communications > Wi-Fi > Advanced Setup > IP Settings > Wi-Fi Static IP.
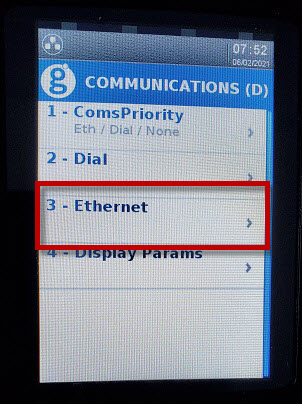
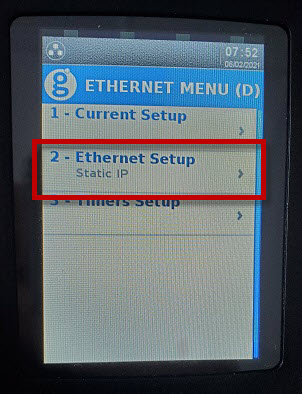
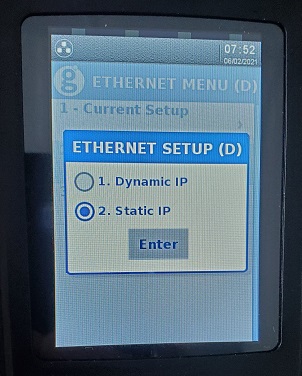
- For the Desk/5000, go to Communications > Ethernet > Ethernet Setup > Static IP.
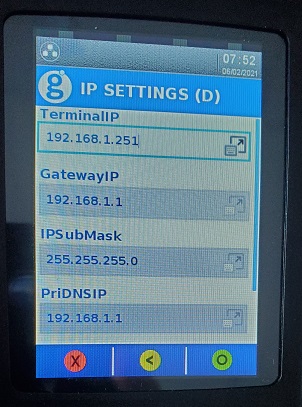
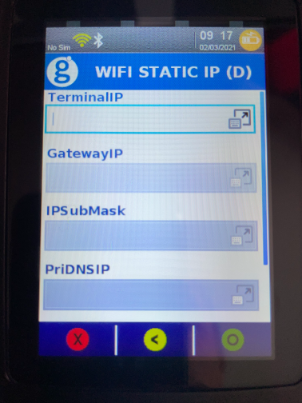
- Enter the static IP, the gateway, and the subnet mask that you noted down in the Terminal IP, Gateway IP, and IP Sub Mask fields respectively.
- Press [cancel] three times return to the home screen.
Configuration of GEM-CAR
Activation
Follow the steps below to activate the integration with Global Payments terminals. You may need the assistance of your network administrator to these settings.
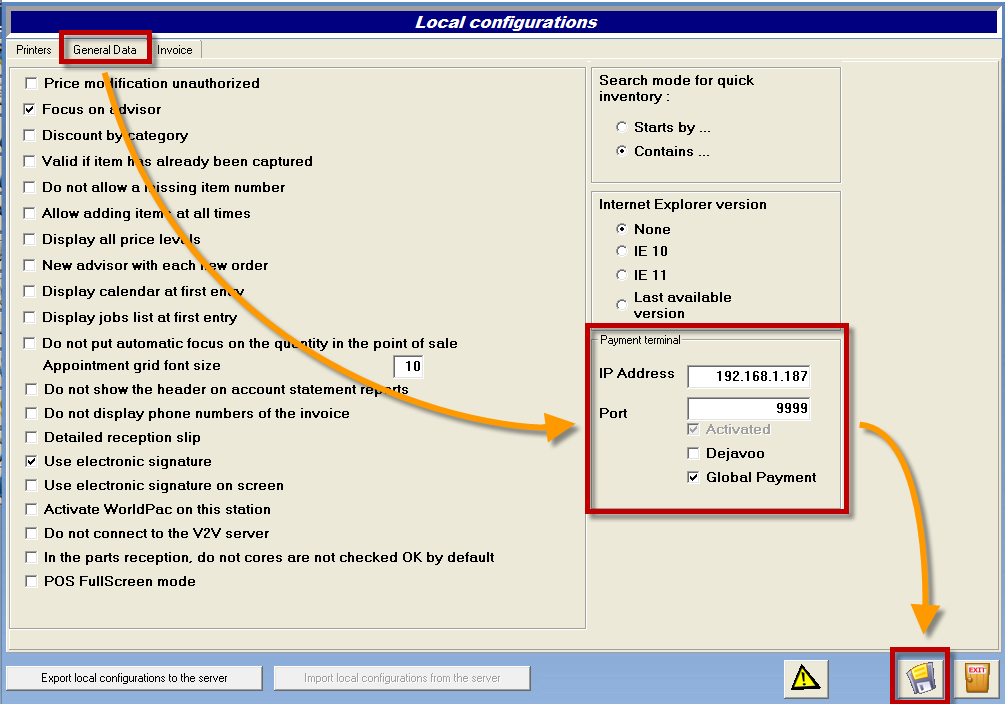
- From the Global Payments terminal, go to Setup Menu > Communications > Display Params and note the information for the static IP address and the port configured on the device.
- From the GEM-CAR Main menu, go to Configuration > Local configuration.
- In the Local configuration window, click on the General Data tab.
- In the Payment terminal section, check the Global payment box.
- Enter the IP address that you noted at step 8 of Enable semi-integration mode in the IP Address field.
- Enter the port information in the Port field.
- Click on the diskette button to save.
Card type configuration
GEM-CAR and the Global Payments terminals must use the same payment codes for the integration to work properly. Therefore, they must be properly configured in the GEM-CAR Payment methods configuration window. The values configured in the Abbreviation field and the Card type drop-down menu must match as in the table below.

Using the Global Payments terminals with GEM-CAR
Start, shut down and reboot the terminals
Desk/5000
When the terminal is connected to the power supply, it will automatically power up. To power it off, simply disconnect the power supply from the electrical outlet.
Move/5000
When you connect the power supply, the terminal will automatically power up. Otherwise, press and hold the green [Enter] key to power it up. To power off the device, remove it from its power source. Press the yellow [clear] key and the [admin] key simultaneously for three seconds. If you just want to restart the terminal, press the yellow [clear] key and the [admin] key simultaneously for three seconds without removing the power source.
Making transactions
When making transactions with customers, make sure the terminal is not in sleep mode (screen turned off) and, if it is, press the green [enter] button to wake it up. Then, from the Receive payments window in GEM-CAR, click on the Send button in the Payments terminal section. This will send all the relevant information to the terminal to complete the transaction. Then, follow the instructions on the terminal to complete the transaction. Once GEM-CAR has sent the transactional data to the terminal, the transaction must be initiated within 30 seconds. If it cannot be initiated within this timeframe, it will abort. GEM-CAR will then show an error message and you will have to reinitiate the transaction. Once completed on the terminal, the transaction will also show as completed in the Receive payment window in GEM-CAR.
![]()
Refunds and negative transactions
For refunds and negative transactions, the Global Payments terminal will only accept numbers preceded by the minus (-) sign, for example -450.85. Negative numbers within brackets will not work.
When you begin the end-of-day-procedure in GEM-CAR, integrated terminals will start printing the settlement report automatically. You do not have to initiate the printing manually from the terminals.
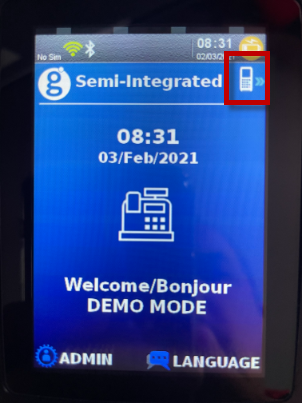
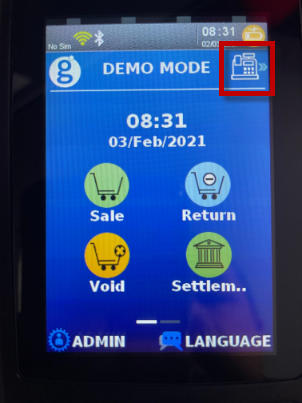
Switch between Semi-integration and Standalone modes
If, in some situations, you require the terminals to work without any link with GEM-CAR, you may want to switch between Semi-integration mode and standalone modes. It could be, for example, if you need to make some transactions unrelated to GEM-CAR. While the terminals are in standalone mode, there is no communication between them and GEM-CAR, so integration will not work. If you need help using the terminals in Standalone mode, please refer to their user manual or contact Global Payments for assistance.
To exit Semi-Integration mode, tap the terminal icon located on top right corner. The terminals will then switch to Standalone mode. To go back to Semi-integration mode, tap the cash drawer icon.
Download update files
Follow the steps below to download update files on the terminals.
- Make sure the terminal is in Semi-integrated mode.
- Do the end-of-day procedure before downloading the update files on the terminal to avoid problems with transactional data sharing with GEM-CAR.
- From the home screen on the terminal, press [admin].
- Select Maintenance.
- Select Download.
- Select Start Download.
- Once the download is complete, you will be notified by the SUCCEEDED message on the terminal.
- The terminal will then reboot and the PARAMETER DATA UPDATE SUCCEEDED message will display onscreen.
Once the download has succeeded and the terminal has rebooted, you can continue making transactions. If the update files will not download or you cannot complete the procedure, please contact Global Payments.
Contact Global Payments
If your terminals need to be updated or you need any assistance, please contact Global Payments by phone at 1-800-263-2970 or visit their website. They will provide you with the procedure for the update or assist you for technical support.
Troubleshooting
If you run into a setup error message when using a terminal, redo the Enable semi-integration mode procedure. At step 8, make sure there is no space before 9999.
Related topics
Factory reset
After having tried everything in this user manual, if the Move/5000 or desk/5000 terminal still won't connect to GEM-CAR 14, you can try to do a factory reset and configure it again. To do so, follow the instructions below.
- While the terminal is powered on, hold [clear] + [admin] until it turns off.
- While the terminal is powered off, hold [enter] until it turns on.
- Configure the terminal again.