Tax management
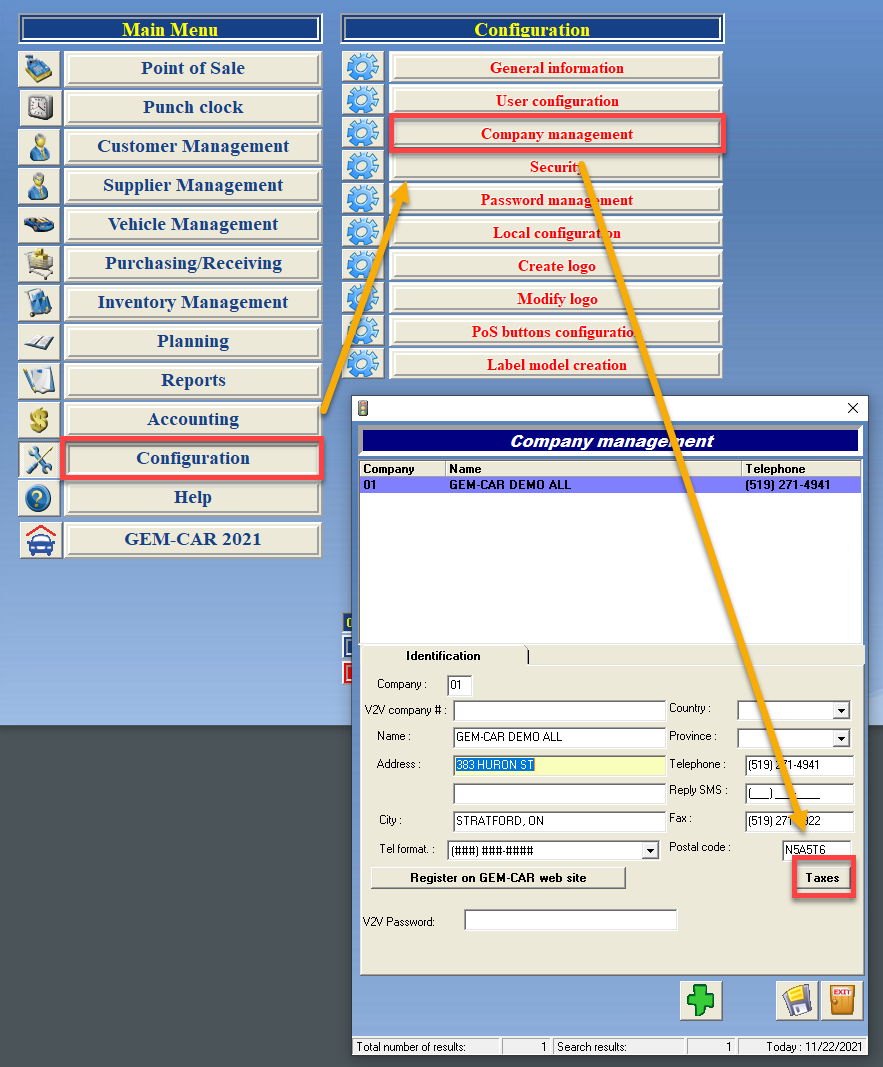
GEM-CAR 14 manages taxes when invoicing customers. To do so, it requires some configuration. Because different inventory items may be subject to different tax requirements, you can configure tax groups. You can then associate them with inventory items. To open the Tax group management window, in the GEM-CAR 14 Main menu, go to Configuration > Company management. Then, select the Taxes button.
Tax groups
Tax groups can contain several taxes or simply be non-taxable. You can also configure custom rates to suit different inventory item needs.
Add tax groups
To add tax groups, in the Tax group management window, follow the instructions below.
- Select the + button in the top part of the window.
- Configure the tax group.
- Add taxes to the group.
- Select the Diskette in the top part of the window to save.

Edit tax groups
To edit tax groups, in the Tax group management window, follow the instructions below.
- Select a tax group on the list.
- Configure the tax group.
- Add or delete taxes in the group.
- Select the Diskette in the top part of the window to save.

Delete tax groups
To delete tax groups, in the Tax group management window, follow the instructions below.
- Select a tax group on the list.
- Select the - button in the top part of the window.

- When asked, confirm the deletion.
Tax group options
When adding or editing tax groups, follow the guidelines below to configure the options.
- Rank: Enter a number in this field. It determines the tax group order on the list.
- Name or description: Enter a name or a description for the tax group in this field.
- Abbreviation: Enter an abbreviation for the tax group in this field.
- Non-taxable group: Select this option to create a non-taxable group.
- Simply Accounting tax code: If you use Simply Accounting, enter your Simply Accounting tax code in this field.

- Rate (%): Enter the rate for the tax in this field.
- Effective date: Enter the date the tax will be in force in this field.
- Max. amount: If the tax has a manimum amount, enter it in this field.
- Cumulative: If the tax is cumulative, select this option.

Add taxes to groups
To add taxes to groups, in the Tax group management window, under Taxes of the tax group follow the instructions below.
- Select a tax group on the list.
- Select the next available empty space in the Tax column.
- In the Management of tax groups window, double-click a tax on the list.
- Back to the Tax group management window, select the Diskette in the bottom part of the window to save.

Edit taxes in groups
Editing taxes in groups is not possible. If you need to make changes to a tax, delete it and add it again to the group.
Delete taxes from groups
To delete taxes from groups, in the Tax group management window, follow the instructions below.
- Select a tax group on the list.
- Select the tax number in the Level column.
- Select the - button in the bottom part of the window.
- When asked, confirm the deletion.

Taxes
Add taxes
To add taxes, in the Tax group management window, follow the instructions below.
- Select the empty space in the next available Tax column.
- In the Management of tax groups window, select the + button.
- Configure the tax.
- Select the Diskette to save.

Edit taxes
Editing taxes is not possible. If you need to make changes to a tax, like for example to correct a wrong rate, delete it and add it again.
New tax rates
Tax rates regularly change. When you need to update a tax rate, add a new identical tax in the tax group with the new rate and effective date. GEM-CAR will automatically stop to use the old tax start to use this new tax as of the effective date. Therefore, don't delete the tax with the old rate until the new rate is effective.
Delete taxes
To delete taxes, in the Tax group management window, follow the instructions below.
- Select the empty space in the next available Tax column.
- In the Management of tax groups window, select a tax on the list.
- Select the - button.
- When asked, confirm the deletion.

Configure tax options
When adding taxes, follow the guidelines below to configure the options.
- Display name: Enter a name for the tax in this field.
- Number: Enter your tax number for this tax in this field.
- GL code sales: Enter your sales ledger number in this field.
- GL code purchases: Enter your purchase ledger number in this field.
- Display the tax rate on the invoice: Enable this option if you want the tax rate to show on invoices.
